1 springboot概述 1.1 概述 Spring Boot是Spring提供的一个子项目,用于快速构建Spring应用程序。
1.2 传统方式构建spring应用程序 1 导入依赖繁琐。
1.3 SpringBoot特性 1.3.1 起步依赖 本质上就是一个Maven坐标,整合了完成一个功能需要的所有坐标。(解决配置繁琐的问题)
1.3.2 自动配置 遵循约定大于配置的原则,在boot程序启动后,一些bean对象会自动注入到iloc容器,不需要手动声明,简化开发。(解决项目配置繁琐的问题)
1.3.3 其他特性 1 内嵌的Tomcat、Jetty(无需部署WAR文件)。
2 sprintboot入门 需求:使用SpringBoot开发一个web应用,浏览器发起请求/hello后,给浏览器返回字符串”hello world~”。
1 创建Maven工程。
1
2
3
4
5
6
7
@RestController public class HelloController @RequestMapping ("/hello" ) public String hello () return "Hello World~" ; } }
4 提供启动类。
1 2 3 4 5 6 7 @SpringBootApplication public class SpringbootSyqApplication public static void main (String[] args) SpringApplication.run(SpringbootSyqApplication.class , args ) ; } }
3 sprintboot工程创建 手动创建SpringBoot工程
4 springboot配置文件_基本使用 4.1 学习路径 4.1.1 基础篇 配置文件。
4.1.2 实战篇 项目开发。
4.1.3 面试篇 面试题。
4.2 配置文件 1 properties配置文件。application.properties文件。
1 2 3 4 server.port=9090 server.servlet.context-path=/start
2 yaml配置文件(实际开发中更常用)。application.yml(主要)/application.yaml。
5 yml配置信息书写和获取 5.1 三方技术配置信息 只需编写配置信息,起步依赖会自动获取配置信息。
5.2 自定义配置信息 不仅需要编写配置信息,还需要实现配置信息的获取代码。
5.3 yml配置信息书写 1 值前边必须有空格,作为分隔符。
1 2 3 4 5 hobbies: - 打篮球 - 打豆豆 - 打游戏
5.4 配置信息的获取 5.4.1 @Value 1 2 3 4 5 6 @Value ("${键名}" )@Value ("${email.user}" )public String user;
在使用@Value注解时,多个层级的键名使用.来连接。
5.4.2 ConfigurationProperties(prefix=”前缀”) 实体类的成员变量名与配置文件中的键名一致。
1 @ConfigurationProperties (prefix="email" )
6 springboot整合mybatis 1 引入mybatis-spring-boot-starter依赖。pom.xml文件修改。
1 2 3 4 5 6 7 8 9 10 11 12 13 14 15 16 <dependency > <groupId > org.springframework.boot</groupId > <artifactId > spring-boot-starter-web</artifactId > </dependency > <dependency > <groupId > org.mybatis.spring.boot</groupId > <artifactId > mybatis-spring-boot-starter</artifactId > <version > 3.0.3</version > </dependency > <dependency > <groupId > com.mysql</groupId > <artifactId > mysql-connector-j</artifactId > </dependency >
2 yml文件数据库配置。数据库驱动,数据库链接,用户名,密码等。SpringBoot自动读取配置信息。
1 2 3 4 5 6 spring: datasource: driver-class-name: com.mysql.cj.jdbc.Driver url: jdbc:mysql://localhost:3306/kongming username: root password: 181234
目标:查询User表指定id的数据,响应给浏览器。
1 2 3 4 5 6 @Mapper public interface UserMapper @Select ("select * from user where id = #{id}" ) public User findById (Integer id) }
Service编写:
1 2 3 4 5 6 7 8 9 10 11 12 13 14 15 16 17 public interface UserService public User findById (Integer id) } @Service public class UserServiceImpl implements UserService @Autowired private UserMapper userMapper; @Override public User findById (Integer id) return userMapper.findById(id); } }
Controller编写:
1 2 3 4 5 6 7 8 9 10 @RestController public class UserController @Autowired private UserService userService; @RequestMapping ("/findById" ) public User findById (Integer id) return userService.findById(id); } }
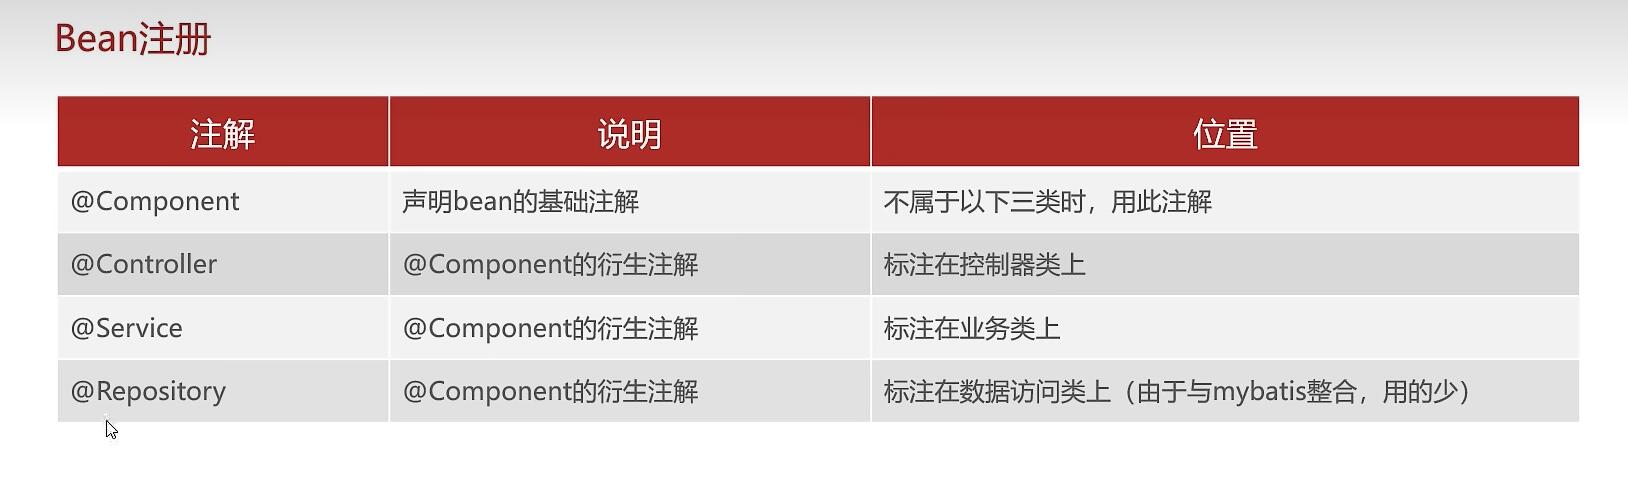
7 Bean扫描 标签:
1 <context:component-scan base-package ="com.kongming" >
注解:
1 @ComponentScan (basePackages="com.kongming" )
在SpringBoot启动类的注解,实际上是一个组合注解:
1 2 3 4 5 6 7 8 9 @SpringBootApplication @ComponentScan (basePackages="com.kongming" )@SpringBootConfiguration @EnableAutoConfiguration @ComponentScan
8 Bean注册
1 mvn install:install-file -Dfile=C:\SunYuQi\data\研一\工作\springboot资料\02_资料\02_Bean注册资料\common-pojo-1.0-SNAPSHOT.jar -DgroupId=cn.itcast -DartifactId=common-pojo -Dversion=1.0 -Dpackaging=jar
1 2 3 4 5 6 <!--第三方包导入--> <dependency> <groupId>cn.itcast</groupId> <artifactId>common-pojo</artifactId> <version>1.0</version> </dependency>
8.1 @Bean 1 2 3 4 5 6 7 8 9 10 11 12 13 14 15 16 17 18 @Configuration @SpringBootApplication public class SpringbootSyqApplication public static void main (String[] args) ApplicationContext context = SpringApplication.run(SpringbootSyqApplication.class , args ) ; Country country = context.getBean(Country.class ) ; System.out.println(country); } @Bean public Country country () return new Country(); } }
建议的写法:
1 2 3 4 5 6 7 8 9 10 11 12 13 14 15 16 17 18 19 20 21 22 23 24 25 26 27 28 29 30 31 32 33 34 35 36 @Configuration public class CommonConfig @Bean public Country country () return new Country(); } @Bean public Province province () return new Province(); } @Bean ("aa" ) @Bean () public Province province () System.out.println("province" +country()); return new Province(); } } ```java @SpringBootApplication public class SpringbootSyqApplication public static void main (String[] args) ApplicationContext context = SpringApplication.run(SpringbootSyqApplication.class , args ) ; Country country = context.getBean(Country.class ) ; System.out.println(country); System.out.println(context.getBean("province" )); } }
8.2 @Import 使用@Import相当于手动扫描类。
1 2 3 4 5 6 7 8 9 10 11 12 13 @SpringBootApplication @Import (CommonConfig.class ) public class SpringbootSyqApplication public static void main (String[] args) ApplicationContext context = SpringApplication.run(SpringbootSyqApplication.class , args ) ; Country country = context.getBean(Country.class ) ; System.out.println(country); System.out.println(context.getBean("province" )); } }
1 2 3 4 5 6 7 8 9 10 @Import (CommonImportSelector.class ) public class CommonImportSelector implements ImportSelector @Override public String[] selectImports(AnnotationMetadata importingClassMetadata) { return new String[]{"config.CommonConfig" }; } }
在配置文件中,每行一个类名。实现上述代码的注释部分,完整如下:
1 2 3 4 5 6 7 8 9 10 11 12 13 14 15 16 17 18 19 20 21 22 23 24 25 26 27 public class CommonImportSelector implements ImportSelector @Override public String[] selectImports(AnnotationMetadata importingClassMetadata) { List<String> imports = new ArrayList<String>(); InputStream is = CommonImportSelector.class.getClassLoader().getResourceAsStream("common.imports"); BufferedReader br = new BufferedReader(new InputStreamReader(is)); String line = null ; try { while ((line = br.readLine())!=null ){ imports.add(line); } } catch (IOException e) { throw new RuntimeException(e); } finally { if (br!=null ){ try { br.close(); } catch (IOException e) { throw new RuntimeException(e); } } } return imports.toArray(new String[0 ]); } }
1 2 3 4 5 6 7 8 9 10 @Target (ElementType.TYPE)@Retention (RetentionPolicy.RUNTIME)@Import (CommonImportSelector.class ) public @interface EnableCommonConfig } @EnableCommonConfig
9 注册条件 9.1 需要注册条件的原因 配置文件中配置:
1 2 3 country: name: china system: socialism
在java文件中读取配置:
1 2 3 4 5 6 7 8 9 10 11 12 13 14 15 16 17 @Configuration public class CommonConfig @Bean public Country country (@Value("${country.name}" ) String name, @Value ("${country.system}" ) String system) Country country = new Country(); country.setName(name); country.setSystem(system); return country; } @Bean () public Province province (Country country) System.out.println("province" +country); return new Province(); } }
我们希望达到的效果是,如果配置文件中配置了指定的信息,则注入,否则不注入。
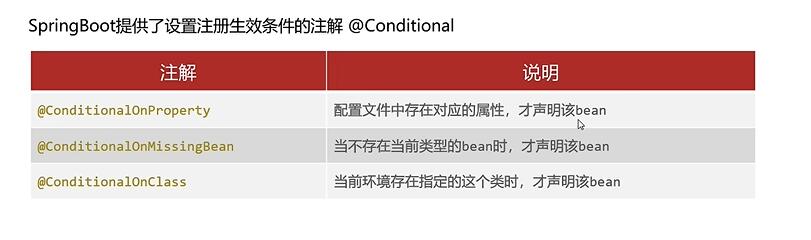
9.2 注册条件 SpringBoot提供了设置注册生效条件的注解@Conditional.
1 2 3 4 5 6 7 8 9 10 @ConditionalOnProperty (prefix = "country" ,name = {"name" ,"system" })@Bean public Country country (@Value("${country.name}" ) String name, @Value ("${country.system}" ) String system) Country country = new Country(); country.setName(name); country.setSystem(system); return country; }
1 2 3 4 5 6 @Bean ()@ConditionalOnMissingBean (Country.class ) public Province province () return new Province(); }
1 2 3 4 5 6 7 @Bean ()@ConditionalOnClass (name="org.springframework.web.servlet.DispatcherServlet" )public Province province () return new Province(); }
10 自动配置原理 10.1 需要学习自动配置原理的原因 1 自定义starter。
10.2 自动配置体验 遵循约定大于配置的原则,在boot程序启动后,起步依赖中的一些bean对象会自动注入到ioc容器。程序引入spring-boot-starter-web起步依赖,启动后,会自动往ioc容器中注入DispatcherServlet。
1 mvn install:install-file -Dfile=C:\SunYuQi\data\研一\工作\springboot资料\02_资料\03_自动配置\common-pojo-2.0-SNAPSHOT.jar -DgroupId=cn.itcast -DartifactId=common-pojo -Dversion=2.0 -Dpackaging=jar
10.3 自动配置原理 在主启动类上添加了SpringBootApplication注解,这个注解组合了EnableAutoConfiguration注解。
11 自定义starter 11.1 场景 在实际开发中,经常会定义一些公共组件,提供给各个项目团队使用。而在SpringBoot的项目中,一般会将公共组件封装为SpringBoot的starter。
11.2 自定义mybatis的starter 1 创建dmybatis-spring-boot-autoconfigure模块,提供自动配置功能,并自定义配置文件 META/INF/spring/xxx.imports.
1 2 3 4 5 6 7 8 9 10 11 12 13 14 15 16 17 18 19 20 21 22 23 24 25 @AutoConfiguration public class MybatisAutoConfig @Bean public SqlSessionFactoryBean sqlSessionFactoryBean (DataSource dataSource) SqlSessionFactoryBean sqlSessionFactoryBean = new SqlSessionFactoryBean(); sqlSessionFactoryBean.setDataSource(dataSource); return sqlSessionFactoryBean; } @Bean public MapperScannerConfigurer mapperScannerConfigurer (BeanFactory beanFactory) MapperScannerConfigurer mapperScannerConfigurer = new MapperScannerConfigurer(); List<String> packages = AutoConfigurationPackages.get(beanFactory); String p = packages.get(0 ); mapperScannerConfigurer.setBasePackage(p); mapperScannerConfigurer.setAnnotationClass(Mapper.class ) ; return mapperScannerConfigurer; } }
1 com.kongming.config.MybatisAutoConfig
pom文件中是定义好的autoconfig和autoconfig的依赖。
1 2 3 4 5 6 7 8 9 10 11 12 13 14 15 16 17 18 19 20 21 22 23 24 25 26 27 <dependency > <groupId > com.kongming</groupId > <artifactId > dmybatis-spring-boot-autoconfigure</artifactId > <version > 1.0-SNAPSHOT</version > </dependency > <dependency > <groupId > org.springframework.boot</groupId > <artifactId > spring-boot-starter</artifactId > <version > 3.3.1</version > </dependency > <dependency > <groupId > org.springframework.boot</groupId > <artifactId > spring-boot-starter-jdbc</artifactId > <version > 3.3.1</version > </dependency > <dependency > <groupId > org.mybatis</groupId > <artifactId > mybatis</artifactId > <version > 3.5.14</version > </dependency > <dependency > <groupId > org.mybatis</groupId > <artifactId > mybatis-spring</artifactId > <version > 3.0.3</version > </dependency > <dependency >
12 实战篇-开发模式和环境搭建 12.1 实战开发的技术栈 后台:
12.2 开发模式 接口文档:
12.3 环境搭建 执行资料中的big_event.sql脚本,准备数据库表。
1 2 3 4 5 6 7 8 9 10 11 12 13 14 15 16 <dependency > <groupId > org.springframework.boot</groupId > <artifactId > spring-boot-starter-web</artifactId > </dependency > <dependency > <groupId > org.mybatis.spring.boot</groupId > <artifactId > mybatis-spring-boot-starter</artifactId > <version > 3.0.3</version > </dependency > <dependency > <groupId > com.mysql</groupId > <artifactId > mysql-connector-j</artifactId > </dependency >
配置文件application.yml中引入mybatis的配置信息。
1 2 3 4 5 6 spring: datasource: driver-class-name: com.mysql.cj.jdbc.Driver url: jdbc:mysql://localhost:3306/kongming username: root password: 181234
创建包结构,并准备实体类。
13 实战篇-注册接口 用户模块需要开发的接口:
lowbok:在编译阶段为实体类自动生成setter,getter,toString方法
1 2 3 4 <dependency > <groupId > org.projectlombok</groupId > <artifactId > lombok</artifactId > </dependency >
1 2 3 4 5 6 7 8 9 10 11 @Data public class User private Integer id; private String username; private String password; private String nickname; private String email; private String userPic; private LocalDateTime createTime; private LocalDateTime updateTime; }
在其余实体类中都添加Data注解。在缺少构造方法的实体类中添加下列注解:
1 2 3 4 @NoArgsConstructor @AllArgsConstructor
13.1 注册 明确需求->阅读接口文档->思路分析->开发->测试。
13.1.1 基本信息 请求路径:/user/register
13.1.2 请求参数 请求参数格式:x-www-form-urlencoded
请求参数说明:
参数名称
说明
类型
是否必须
备注
username
用户名
string
是
5~16位非空字符
password
密码
string
是
5~16位非空字符
请求数据样例:
1 username=zhangsan&password=123456
13.1.3 响应数据 响应数据类型:application/json
响应参数说明:
名称
类型
是否必须
默认值
备注
其他信息
code
number
必须
响应码, 0-成功,1-失败
message
string
非必须
提示信息
data
object
非必须
返回的数据
响应数据样例:
1 2 3 4 5 { "code" : 0 , "message" : "操作成功" , "data" : null }
13.2 代码编写 1 Controller部分。
1 2 3 4 5 6 7 8 9 10 11 12 13 14 15 16 17 18 19 20 21 22 23 @RestController @RequestMapping ("/user" )public class UserController @Autowired private UserService userService; @PostMapping ("/register" ) public Result register (String username, String password) User u = userService.findByUserName(username); if (u == null ){ userService.register(username,password); return Result.success(); }else { return Result.error("用户名已被占用" ); } } }
2 Service部分。
1 2 3 4 5 6 7 8 9 public interface UserService User findByUserName (String username) ; void register (String username, String password) }
1 2 3 4 5 6 7 8 9 10 11 12 13 14 15 16 17 18 19 @Service public class UserServiceImpl implements UserService @Autowired private UserMapper userMapper; @Override public User findByUserName (String username) User u = userMapper.findByUserName(username); return u; } @Override public void register (String username, String password) String md5String = Md5Util.getMD5String(password); userMapper.add(username,md5String); } }
3 Mapper部分。
1 2 3 4 5 6 7 8 9 10 @Mapper public interface UserMapper @Select ("select * from user where username=#{username}" ) User findByUserName (String username) ; @Insert ("insert into user(username,password,create_time,update_time)" + "values (#{username},#{password},now(),now())" ) void add (String username, String password) }
14 实战篇-注册接口参数校验 在接口文档中,请求参数必须是5-16位的非空字符。后端必须保证前端传来的参数是符合要求的。
14.1 手动添加校验 在controller层添加校验。
1 2 3 4 5 6 7 8 9 10 11 12 13 14 15 16 17 18 19 20 21 22 23 24 25 26 27 28 @RestController @RequestMapping ("/user" )public class UserController @Autowired private UserService userService; @PostMapping ("/register" ) public Result register (String username, String password) if (username != null && username.length()>=5 && username.length()<=16 && password != null && password.length()>=5 && password.length()<=16 ) { User u = userService.findByUserName(username); if (u == null ){ userService.register(username,password); return Result.success(); }else { return Result.error("用户名已被占用" ); } }else { return Result.error("参数不合法" ); } } }
14.2 Spring Validation 上述参数校验代码过于繁琐,Spring提供一个参数校验框架,使用预定义的注解完成参数校验。
1 2 3 4 5 <dependency > <groupId > org.springframework.boot</groupId > <artifactId > spring-boot-starter-validation</artifactId > </dependency >
2 在参数前面添加@Pattern注解。
1 2 3 4 5 6 7 8 9 10 11 12 13 14 15 16 17 18 19 20 21 22 23 24 @RestController @RequestMapping ("/user" )@Validated public class UserController @Autowired private UserService userService; @PostMapping ("/register" ) public Result register (@Pattern(regexp = "^\\S{5,16}$" ) String username, @Pattern (regexp = "^\\S{5,16}$" ) String password) User u = userService.findByUserName(username); if (u == null ){ userService.register(username,password); return Result.success(); }else { return Result.error("用户名已被占用" ); } } }
3 在Controller类上添加@Validation注解。
4 在全局异常处理器中处理参数校验失败的异常。参数校验失败异常处理。@Restxxxb表示所有返回值都会被自动转化为json字符串。
1 2 3 4 5 6 7 8 @RestControllerAdvice public class GlobalExceptionHandler @ExceptionHandler (Exception.class ) public Result handleException (Exception e ) { e.printStackTrace(); return Result.error(StringUtils.hasLength(e.getMessage())?e.getMessage():"操作失败" ); } }
15 实战篇-登录主逻辑 15.1 基本信息
请求路径:/user/login
15.2 请求参数 请求参数格式:x-www-form-urlencoded
请求参数说明:
参数名称
说明
类型
是否必须
备注
username
用户名
string
是
5~16位非空字符
password
密码
string
是
5~16位非空字符
请求数据样例:
1 username=zhangsan&password=123456
15.3 响应数据 响应数据类型:application/json
响应参数说明:
名称
类型
是否必须
默认值
备注
其他信息
code
number
必须
响应码, 0-成功,1-失败
message
string
非必须
提示信息
data
string
必须
返回的数据,jwt令牌
响应数据样例:
1 2 3 4 5 { "code" : 0 , "message" : "操作成功" , "data" : "eyJhbGciOiJIUzI1NiIsInR5cCI6IkpXVCJ9.eyJjbGFpbXMiOnsiaWQiOjUsInVzZXJuYW1lIjoid2FuZ2JhIn0sImV4cCI6MTY5MzcxNTk3OH0.pE_RATcoF7Nm9KEp9eC3CzcBbKWAFOL0IsuMNjnZ95M" }
jwt令牌是一串字符串。
15.4 备注说明
用户登录成功后,系统会自动下发JWT令牌,然后在后续的每次请求中,浏览器都需要在请求头header中携带到服务端,请求头的名称为 Authorization,值为登录时下发的JWT令牌。
15.5 代码实现 service和mapper使用用户注册中写好的即可。主要需要在controller中添加用户登录模块代码。
1 2 3 4 5 6 7 8 9 10 11 12 13 14 15 @PostMapping ("/login" )public Result<String> login (@Pattern(regexp = "^\\S{5,16}$" ) String username, @Pattern (regexp = "^\\S{5,16}$" ) String password) User loginUser = userService.findByUserName(username); if (loginUser == null ){ return Result.error("用户名错误" ); } if (Md5Util.getMD5String(password).equals(loginUser.getPassword())){ return Result.success("jwt token令牌.." ); } return Result.error("密码错误" ); }
16 实战篇-登录认证引入 登录认证-在未登录的情况下,可以访问到其他资源。
17 实战篇-JWT令牌 17.1 JWT简介 全称:JSON Web Token
第一部分:Header(头),记录令牌类型,签名算法等。例如{“alg”:”HS256”,”type”:”JWT”}。加密算法是用于防篡改。
第二部分:Payload(有效载荷),携带一些自定义信息、默认信息等。例如{“id”:”1”,”username”:”Tom”}
第三部分:Signature(签名),防止Token被篡改、确保安全性。将header、payload,并加入指定密钥,通过指定签名算法计算而来。
17.2 JWT-生成 1 引入pom依赖。
1 2 3 4 5 6 7 8 9 10 11 <dependency > <groupId > com.auth0</groupId > <artifactId > java-jwt</artifactId > <version > 4.4.0</version > </dependency > <dependency > <groupId > org.springframework.boot</groupId > <artifactId > spring-boot-starter-test</artifactId > </dependency >
2 生成JWT。
1 2 3 4 5 6 7 8 9 10 11 12 13 14 public class JwtTest @Test public void testGen () Map<String, Object> claims = new HashMap<>(); claims.put("id" ,1 ); claims.put("username" ,"kongming" ); String token = JWT.create() .withClaim("user" ,claims) .withExpiresAt(new Date(System.currentTimeMillis() + 1000 *60 *60 *12 )) .sign(Algorithm.HMAC256("kongming" )); System.out.println(token); } }
3 验证JWT
1 2 3 4 5 6 7 8 9 10 11 12 13 14 @Test public void testParse () String token = "eyJhbGciOiJIUzI1NiIsInR5cCI6IkpXVCJ9" + ".eyJ1c2VyIjp7ImlkIjoxLCJ1c2VybmFtZSI6ImtvbmdtaW5nIn0sImV4cCI6MTcyMTY1NzU5NH0" + ".o2AiTydAFdgI2U_NXnqiLhuEwUEQCPnl76IQSVxjMi4" ; JWTVerifier jwtVerifier = JWT.require(Algorithm.HMAC256("kongming" )).build(); DecodedJWT decodedJWT = jwtVerifier.verify(token); Map<String, Claim> claims = decodedJWT.getClaims(); System.out.println(claims.get("user" )); }
JWT校验时使用的密钥签名,必须和生成JWT令牌时使用的密钥是配套的。
如果JWT令牌解析校验时报错,则说明JWT令牌被篡改或失效了,令牌非法。
18 实战篇-登录认证-完成 在UserController部分生成JWT。
1 2 3 4 5 6 7 8 9 if (Md5Util.getMD5String(password).equals(loginUser.getPassword())){ Map<String, Object> claims = new HashMap<>(); claims.put("id" ,loginUser.getId()); claims.put("username" ,loginUser.getUsername()); String token = JwtUtil.genToken(claims); return Result.success(token); }
在功能模块添加JWT验证部分。例如获取文章列表部分。
1 2 3 4 5 6 7 8 9 10 11 12 public Result<String> list (@RequestHeader(name = "Authorization" ) String token, HttpServletResponse response) try { Map<String, Object> claims = JwtUtil.parseToken(token); return Result.success("所有的文章数据..." ); } catch (Exception e) { response.setStatus(401 ); return Result.error("未登录" ); } }
使用拦截器统一完成JWT验证。
1 2 3 4 5 6 7 8 9 10 11 12 13 14 15 16 17 18 19 20 21 @Component public class LoginInterceptor implements HandlerInterceptor @Override public boolean preHandle (HttpServletRequest request, HttpServletResponse response, Object handler) throws Exception String token = request.getHeader("Authorization" ); try { Map<String, Object> claims = JwtUtil.parseToken(token); return true ; } catch (Exception e) { response.setStatus(401 ); return false ; } } }
在工程目录下创建config/WebConfig.class文件。
1 2 3 4 5 6 7 8 9 10 11 12 13 @Configuration public class WebConfig implements WebMvcConfigurer @Autowired private LoginInterceptor loginInterceptor; @Override public void addInterceptors (InterceptorRegistry registry) registry.addInterceptor(loginInterceptor).excludePathPatterns("/user/login" ,"/user/register" ); } }
此时之前写在获取文章列表部分的登录验证代码可以注释掉了。
19 实战篇-获取用户详细信息 1 2 3 4 5 6 7 8 9 10 11 12 @GetMapping ("/userInfo" ) public Result<User> userInfo (@RequestHeader(name = "Authorization" ) String token) Map<String,Object> map = JwtUtil.parseToken(token); String username = map.get("username" ).toString(); User user = userService.findByUserName(username); return Result.success(user); }
防止springBoot把用户的密码返回给前端。
1 2 3 4 5 6 7 8 9 10 11 12 13 14 15 16 import com.fasterxml.jackson.annotation.JsonIgnore;@Data public class User private Integer id; private String username; @JsonIgnore private String password; private String nickname; private String email; private String userPic; private LocalDateTime createTime; private LocalDateTime updateTime; }
当前返回给前端的数据中创建时间和更新时间为空的原因是因为在数据库中这两个字段是下划线命名,而在User类中是驼峰命名。
1 2 3 mybatis: configuration: map-underscore-to-camel-case: true
20 实战篇-获取用户详细信息-ThreadLocal优化 在拦截器里写的解析token的代码,在userInfo方法中被再写了一次。在线程内实现代码复用,在拦截器里写的解析token代码,不会再出现在userInfo方法中。
ThreadLocal-提供线程局部变量。用来存取数据:set()/get()。使用ThreadLocal存储的数据,线程安全。使用示例如下:
1 2 3 4 5 6 7 8 9 10 11 12 13 14 15 16 17 18 19 20 21 22 23 public class ThreadLocalTest @Test public void testThreadLocalSetAndGet () ThreadLocal tl = new ThreadLocal(); new Thread(()->{ tl.set("诸葛亮" ); System.out.println(Thread.currentThread().getName()+": " +tl.get()); System.out.println(Thread.currentThread().getName()+": " +tl.get()); System.out.println(Thread.currentThread().getName()+": " +tl.get()); },"蓝色" ).start(); new Thread(()->{ tl.set("孔明" ); System.out.println(Thread.currentThread().getName()+": " +tl.get()); System.out.println(Thread.currentThread().getName()+": " +tl.get()); System.out.println(Thread.currentThread().getName()+": " +tl.get()); },"绿色" ).start(); } }
后端的三个组成是:Controller,Service,Dao
在过滤器中存储。
1 2 3 4 5 6 7 8 9 10 11 12 13 14 15 16 17 18 19 20 21 22 23 24 25 26 27 28 29 @Component public class LoginInterceptor implements HandlerInterceptor @Override public boolean preHandle (HttpServletRequest request, HttpServletResponse response, Object handler) throws Exception String token = request.getHeader("Authorization" ); try { Map<String, Object> claims = JwtUtil.parseToken(token); ThreadLocalUtil.set(claims); return true ; } catch (Exception e) { response.setStatus(401 ); return false ; } } @Override public void afterCompletion (HttpServletRequest request, HttpServletResponse response, Object handler, Exception ex) throws Exception ThreadLocalUtil.remove(); } }
在userInfo中获取。(controller层中)
1 2 3 4 5 6 7 8 9 10 11 12 13 @GetMapping ("/userInfo" ) public Result<User> userInfo () Map<String,Object> map = ThreadLocalUtil.get(); String username = map.get("username" ).toString(); User user = userService.findByUserName(username); return Result.success(user); }
21 实战篇-更新用户基本信息 在controller中新增updata方法。在Service层中新增updata方法。在DAO层中新增updata查询。
controller方法。
1 2 3 4 5 @PutMapping ("/update" ) public Result update (@RequestBody User user) userService.update(user); return Result.success(); }
service方法。
1 2 3 4 5 6 7 8 9 10 11 12 13 14 15 16 17 18 19 20 21 22 23 24 25 26 27 28 29 30 31 32 33 34 35 36 37 38 39 40 public interface UserService User findByUserName (String username) ; void register (String username, String password) void update (User user) } @Service public class UserServiceImpl implements UserService @Autowired private UserMapper userMapper; @Override public User findByUserName (String username) User u = userMapper.findByUserName(username); return u; } @Override public void register (String username, String password) String md5String = Md5Util.getMD5String(password); userMapper.add(username, md5String); } @Override public void update (User user) user.setUpdateTime(LocalDateTime.now()); userMapper.update(user); }
DAO层,添加update方法。
1 2 3 4 5 6 7 8 9 10 11 12 13 14 @Mapper public interface UserMapper @Select ("select * from user where username=#{username}" ) User findByUserName (String username) ; @Insert ("insert into user(username,password,create_time,update_time)" + "values (#{username},#{password},now(),now())" ) void add (String username, String password) @Update ("update user set nickname=#{nickname},email=#{email},update_time=#{updateTime} where id=#{id}" ) void update (User user) }
22 实战篇-更新用户基本信息_参数校验 根据接口文件中对nickname和Email的要求,对更新的用户基本信息完成校验。在注册接口中,是通过添加pattern注解对参数完成校验。
1 在实体类的成员变量加上validation提供的注解。例如’@NotNull’。
1 2 3 4 5 6 7 8 9 10 11 12 13 14 15 16 17 18 19 20 @Data public class User @NotNull private Integer id; private String username; @JsonIgnore private String password; @NotEmpty @Pattern (regexp = "^\\S{1,10}$" ) private String nickname; @NotEmpty @Email private String email; private String userPic; private LocalDateTime createTime; private LocalDateTime updateTime; }
2 需要在具体使用该注解的函数参数部分添加@Validated注解。这样属性部分的注解(也就是上文中提到的那些)才能生效。
在controller层中。
1 2 3 4 5 @PutMapping ("/update" )public Result update (@RequestBody @Validated User user) userService.update(user); return Result.success(); }
23 实战篇-更新用户头像 在controller层中增加updateAvatar方法。参数校验。对于avatarUrl是否是一个url地址进行校验。
1 2 3 4 5 @PatchMapping ("updateAvatar" )public Result updateAvatar (@RequestParam String avatarUrl) userService.updateAvatar(avatarUrl); return Result.success(); }
在service层中增加updateAvatar方法。
1 2 3 4 5 6 7 8 9 10 11 12 void updateAvatar (String avatarUrl) @Override public void updateAvatar (String avatarUrl) Map<String,Object> map = ThreadLocalUtil.get(); Integer id = Integer.parseInt(map.get("id" ).toString()); userMapper.updateAvatar(avatarUrl,id); }
在DAO层中增加更新头像的sql语句。
1 2 3 @Update ("update user set user_pic=#{avatarUrl},update_time=now() where id=#{id}" )void updateAvatar (String avatarUrl,Integer id)
在用户相关接口更新JWT令牌的时候不要把Authorization:去掉了。
24 实战篇-更新用户密码 在Controller层中新增updatePwd方法,注意添加PatchMapping注解。我们需要申明一个Map类型的参数,用来接收前端提交的json参数。之前我们使用user实体对象来接收,是因为我们之前传进来的键名,刚好和user实体对象的属性名相同。但是现在我们的请求参数的键名是old_pwd,new_pwd,re_pwd,和实体对象的属性名没有办法相同了,于是申明一个Map类型的参数。MVC框架会自动帮我们把json数据转化成map集合对象。
1 2 3 4 5 6 7 8 9 10 11 12 13 14 15 16 17 18 19 20 21 22 23 24 25 26 27 28 29 30 @PatchMapping ("/updatePwd" )public Result updatePwd (@RequestBody Map<String,String> params) String oldPwd = params.get("old_pwd" ); String newPwd = params.get("new_pwd" ); String rePwd = params.get("re_pwd" ); if (!StringUtils.hasLength(oldPwd)||!StringUtils.hasLength(newPwd)||!StringUtils.hasLength(rePwd)){ return Result.error("缺少必要的参数" ); } Map<String,Object> map = ThreadLocalUtil.get(); String username = map.get("username" ).toString(); User loginUser = userService.findByUserName(username); if (!loginUser.getPassword().equals(Md5Util.getMD5String(oldPwd))){ return Result.error("原密码填写不正确" ); } if (!rePwd.equals(newPwd)){ return Result.error("两次填写的新密码不一样" ); } userService.updatePwd(newPwd); return Result.success(); }
在Service层中新增updatePwd方法完成密码更新。
1 2 3 4 5 6 7 8 9 10 11 void updatePwd (String newPwd) @Override public void updatePwd (String newPwd) Map<String,Object> map = ThreadLocalUtil.get(); Integer id = Integer.parseInt(map.get("id" ).toString()); userMapper.updatePwd(Md5Util.getMD5String(newPwd),id); }
在DAO层中新增相应的sql语句。
1 2 @Update ("update user set password=#{md5String},update_time=now() where id=#{id}" )void updatePwd (String md5String, Integer id)
25 实战篇-新增文章分类 在CategoryController中新增add方法。使用@RequestBody注解。
1 2 3 4 5 6 7 8 9 10 11 12 @RestController @RequestMapping ("/category" )public class CategoryController @Autowired private CategoryService categoryService; @PostMapping public Result add (@RequestBody @Validated Category category) categoryService.add(category); return Result.success(); } }
在service层添加add方法。
1 2 3 4 5 6 7 8 9 10 11 12 13 14 15 16 17 18 19 20 21 22 23 public interface CategoryService void add (Category category) } @Service public class CategoryServiceImpl implements CategoryService @Autowired private CategoryMapper categoryMapper; @Override public void add (Category category) category.setCreateTime(LocalDateTime.now()); category.setUpdateTime(LocalDateTime.now()); Map<String,Object> map = ThreadLocalUtil.get(); Integer userid = Integer.parseInt(map.get("id" ).toString()); category.setCreateUser(userid); categoryMapper.add(category); } }
在DAO层添加对应的sql语句。
1 2 3 4 5 6 7 @Mapper public interface CategoryMapper @Insert ("insert into category(category_name,category_alias,create_user,create_time,update_time) " + "values(#{categoryName},#{categoryAlias},#{createUser},#{createTime},#{updateTime})" ) void add (Category category) }
26 实战篇-文章分类列表 和新增文章分类的请求路径都是”\category”,是通过请求方式的不同来区分这两个接口的。新增是POST,文章分类列表的查询是GET。
1 2 3 4 5 @GetMapping public Result<List<Category>> list(){ List<Category> cs = categoryService.list(); return Result.success(cs); }
在CategoryService中新增list方法。
1 2 3 4 5 6 7 8 9 10 11 List<Category> list () ;@Override public List<Category> list () Map<String,Object> map = ThreadLocalUtil.get(); Integer id = Integer.parseInt(map.get("id" ).toString()); return categoryMapper.list(id); }
在mapper层中执行对应的select语句。要根据create_user字段进行查询。
1 2 3 @Select ("select * from category where create_user = #{id}" )List<Category> list (Integer id) ;
修改postman中的日期格式。
1 2 3 4 5 6 7 8 9 10 11 12 13 @Data public class Category private Integer id; @NotEmpty private String categoryName; @NotEmpty private String categoryAlias; private Integer createUser; @JsonFormat (pattern = "yyyy-MM-dd HH:mm:ss" ) private LocalDateTime createTime; @JsonFormat (pattern = "yyyy-MM-dd HH:mm:ss" ) private LocalDateTime updateTime; }
27 实战篇-获取文章分类详情 在categoryController中新增detail方法。
1 2 3 4 5 @GetMapping ("/detail" )public Result<Category> detail (Integer id) Category c = categoryService.findById(id); return Result.success(c); }
在categoryService中新增findById方法。
1 2 3 4 5 6 7 8 9 10 Category findById (Integer id) ;@Override public Category findById (Integer id) Category c = categoryMapper.findById(id); return c; }
在categoryMapper中新增对应sql语句。
1 2 3 @Select ("select * from category where id = #{id}" )Category findById (Integer id) ;
28 实战篇-更新文章分类 请求路径和获取文章分类列表一样,但是请求方式与之(get)不同,为put。
1 2 3 4 5 6 7 8 9 10 11 12 13 14 15 16 17 18 19 20 21 @PutMapping public Result update (@RequestBody @Validated Category category) categoryService.update(category); return Result.success(); } @Data public class Category @NotNull private Integer id; @NotEmpty private String categoryName; @NotEmpty private String categoryAlias; private Integer createUser; @JsonFormat (pattern = "yyyy-MM-dd HH:mm:ss" ) private LocalDateTime createTime; @JsonFormat (pattern = "yyyy-MM-dd HH:mm:ss" ) private LocalDateTime updateTime; }
NotNull和NotEmpty是有区别的。NotNull是不能不传。NoEmpty如果是字符串的话,还不能是空字符串。
1 2 3 4 5 6 7 8 9 10 void update (Category category) @Override public void update (Category category) category.setUpdateTime(LocalDateTime.now()); categoryMapper.update(category); }
在CategoryMapper中添加对应的sql语句。
1 2 3 @Update ("update category set category_name=#{categoryName},category_alias=#{categoryAlias},update_time=#{updateTime} where id=#{id}" )void update (Category category)
29 实战篇-更新文章分类和添加文章分类_分组校验 把校验项进行分组,在完成不同的功能的时候,校验指定组中的校验项。
1 2 3 4 5 6 7 8 9 10 11 12 13 14 15 16 17 @Data public class Category @NotNull (groups = Update.class ) private Integer id ; @NotEmpty (groups = {Add.class , Update .class }) private String categoryName ; @NotEmpty (groups = {Add.class , Update .class }) private String categoryAlias ; private Integer createUser; @JsonFormat (pattern = "yyyy-MM-dd HH:mm:ss" ) private LocalDateTime createTime; @JsonFormat (pattern = "yyyy-MM-dd HH:mm:ss" ) private LocalDateTime updateTime; public interface Add public interface Update }
plus版本。
1 2 3 4 5 6 7 8 9 10 11 12 13 14 15 16 17 18 19 20 @Data public class Category @NotNull (groups = Update.class ) private Integer id ; @NotEmpty private String categoryName; @NotEmpty private String categoryAlias; private Integer createUser; @JsonFormat (pattern = "yyyy-MM-dd HH:mm:ss" ) private LocalDateTime createTime; @JsonFormat (pattern = "yyyy-MM-dd HH:mm:ss" ) private LocalDateTime updateTime; public interface Add extends Default public interface Update extends Default }
3 校验时指定要校验的分组。
1 2 3 4 5 6 7 8 9 10 11 @PostMapping public Result add (@RequestBody @Validated(Category.Add.class) Category category) categoryService.add(category); return Result.success(); } @PutMapping public Result update (@RequestBody @Validated(Category.Update.class) Category category) categoryService.update(category); return Result.success(); }
定义校验项时如果没有指定分组,则属于Default分组,分组可以继承。
30 实战篇-更新文章 在ArticleController中添加add方法。
1 2 3 4 5 6 7 8 9 10 11 @RestController @RequestMapping ("/article" )public class ArticleController @Autowired private ArticleService articleService; @PostMapping public Result add (@RequestBody Article article) articleService.add(article); return Result.success(); } }
在ArticleService中添加add方法。
1 2 3 4 5 6 7 8 9 10 11 12 13 14 15 16 17 18 19 void add (Article article) @Service public class ArticleServiceImpl implements ArticleService @Autowired private ArticleMapper articleMapper; @Override public void add (Article article) article.setCreateTime(LocalDateTime.now()); article.setUpdateTime(LocalDateTime.now()); Map<String,Object> map = ThreadLocalUtil.get(); Integer userId = Integer.parseInt(map.get("id" ).toString()); article.setCreateUser(userId); articleMapper.add(article); } }
在ArticleMapper中添加insert语句。
1 2 3 4 5 6 7 @Mapper public interface ArticleMapper @Insert ("insert into article(title,content,cover_img,state,category_id,create_user,create_time,update_time) " + "values(#{title},#{content},#{coverImg},#{state},#{categoryId},#{createUser},#{createTime},#{updateTime})" ) void add (Article article) }
31 实战篇-新增文章参数校验_自定义校验 对除了state之外的其他字段添加校验。
1 2 3 4 5 6 7 8 9 10 11 12 13 14 15 16 17 18 19 20 21 22 23 24 25 26 @Data public class Article private Integer id; @NotEmpty @Pattern (regexp = "^//S{1,10}$" ) private String title; @NotEmpty private String content; @NotEmpty @URL private String coverImg; private String state; @NotNull private Integer categoryId; private Integer createUser; private LocalDateTime createTime; private LocalDateTime updateTime; } @PostMapping public Result add (@RequestBody @Validated Article article) articleService.add(article); return Result.success(); }
对于state,需要用到自定义校验。
自定义校验是指已有的注解不能满足所有的校验需求,特殊的情况需要自定义校验(自定义校验注解)。
1 自定义注解state。
1 2 3 4 5 6 7 8 9 10 11 12 13 14 @Documented @Constraint ( validatedBy = {StateValidation.class }//指定提供校验规则的类 ) @Target ( {ElementType.FIELD})@Retention (RetentionPolicy.RUNTIME)public @interface State { String message () default "state参数的值只能是已发布或者草稿" ; Class<?>[] groups() default {}; Class<? extends Payload>[] payload() default {}; }
2 自定义校验校验数据的类StateValidation,实现ConstraintValidator接口。
1 2 3 4 5 6 7 8 9 10 11 12 13 14 15 16 17 18 19 20 public class StateValidation implements ConstraintValidator <State ,String > @Override public boolean isValid (String value, ConstraintValidatorContext constraintValidatorContext) if (value == null ){ return false ; } if (value.equals("已发布" )||value.equals("草稿" )){ return true ; } return false ; } }
3 在需要校验的地方使用自定义注解。
1 2 3 4 5 6 7 8 9 10 11 12 13 14 15 16 17 18 19 @Data public class Article private Integer id; @NotEmpty @Pattern (regexp = "^\\S{1,10}$" ) private String title; @NotEmpty private String content; @NotEmpty @URL private String coverImg; @State private String state; @NotNull private Integer categoryId; private Integer createUser; private LocalDateTime createTime; private LocalDateTime updateTime; }
32 实战篇-文章分类列表查询(条件分类) 在ArticleController中新增list方法。需要返回total和一个list包含多个文章。
1 2 3 4 5 6 7 8 9 10 11 @GetMapping public Result<PageBean<Article>> list( Integer pageNum, Integer pageSize, @RequestParam (required = false ) Integer categoryId, @RequestParam (required = false ) String state ){ PageBean<Article> pb = articleService.list(pageNum,pageSize,categoryId,state); return Result.success(pb); }
在ArticleService中新增list方法。构建一个PageBean对象用来封装要查询的数据。分页查询使用PageHelper(mybatis插件)来实现。
1 2 3 4 5 6 <dependency > <groupId > com.github.pagehelper</groupId > <artifactId > pagehelper-spring-boot-starter</artifactId > <version > 1.4.7</version > </dependency >
1 2 3 4 5 6 7 8 9 10 11 12 13 14 15 16 17 18 19 20 21 22 23 PageBean<Article> list (Integer pageNum, Integer pageSize, Integer categoryId, String state) ;@Override public PageBean<Article> list (Integer pageNum, Integer pageSize, Integer categoryId, String state) PageBean<Article> pb = new PageBean<>(); PageHelper.startPage(pageNum,pageSize); Map<String,Object> map = ThreadLocalUtil.get(); Integer userId = Integer.parseInt(map.get("id" ).toString()); List<Article> as = articleMapper.list(userId,categoryId,state); Page<Article> p = (Page<Article>) as; pb.setTotal(p.getTotal()); pb.setItems(p.getResult()); return pb; }
在ArticleMapper中新增相应的Mapper映射条件。
1 2 3 4 5 6 7 8 9 10 11 12 13 14 15 16 17 18 19 20 21 22 <?xml version="1.0" encoding="UTF-8" ?> <!DOCTYPE mapper PUBLIC "-//mybatis.org//DTD Mapper 3.0//EN" "http://mybatis.org/dtd/mybatis-3-mapper.dtd" > <mapper namespace ="com.kongming.mapper.ArticleMapper" > <select id ="list" resultType ="com.kongming.pojo.Article" > select * from article <where > <if test ="categoryId!=null" > category_id=#{categoryId} </if > <if test ="state!=null" > and state=#{state} </if > and create_user=#{userId} </where > </select > </mapper >
1 2 List<Article> list (Integer userId, Integer categoryId, String state) ;
pageNum表示页数,pageSize表示每页的article数量,pageNum=1表示查询的是第一页的数据,如果此时pageSize=2,则表示第一页里需要两条article数据。
33 实战篇-文件上传_本地存储 前端页面三要素。
后端MultipartFile。
1 2 3 4 5 String getOriginalFilename () ;void transferTo (File dest) long getSize () byte [] getBytes();InputStream getInputStream () ;
在FileUploadController中新增upload方法。获取文件内容的输入流,写入到本地磁盘文件。
1 2 3 4 5 6 7 8 9 10 11 12 @RestController public class FileUploadController @PostMapping ("/upload" ) public Result<String> upload (MultipartFile file) throws IOException String originalFilename = file.getOriginalFilename(); String filename = UUID.randomUUID().toString()+originalFilename.substring(originalFilename.lastIndexOf("." )); file.transferTo(new File("C:\\SunYuQi\\data\\研一\\工作\\files\\" +filename)); return Result.success("url访问地址..." ); } }
34 实战篇-文件上传_阿里云OSS_准备工作 云:互联网上的一堆计算机。
阿里云:阿里云是阿里巴巴集团旗下全球领先的云计算公司,也是国内最大的云服务提供商。
阿里云OSS:阿里云对象存储OSS(Object Storage Service),是一款海量,安全,低成本,高可靠的云存储服务。使用OSS,可以通过网络随时存储和调用包括文本,图片,音频和视频等在内的各种文件。
第三方服务-通用思路 准备工作->参照官方SDK编写入门程序->继承使用
SDK:Software Development Kit的缩写,软件开发工具包,包括辅助软件开发的依赖(jar包),代码示例等,都可以叫做SDK。
准备工作 注册登录(实名认证)->充值->开通对象存储服务(OSS)->创建bucket->获取AccessKey(密钥)->参照官方SDK编写入门程序->案例集成OSS
bucket:存储空间是用户用于存储对象(Object,就是文件)的容器,所有的对象都必须隶属于某个存储空间。
35 实战篇-文件上传_阿里云OSS_入门程序 下载SDK。在pom.xml中引入阿里云提供的依赖。
1 2 3 4 5 6 7 8 9 10 11 12 13 14 15 16 17 18 19 20 21 22 <dependency > <groupId > com.aliyun.oss</groupId > <artifactId > aliyun-sdk-oss</artifactId > <version > 3.17.4</version > </dependency > <dependency > <groupId > javax.xml.bind</groupId > <artifactId > jaxb-api</artifactId > <version > 2.3.1</version > </dependency > <dependency > <groupId > javax.activation</groupId > <artifactId > activation</artifactId > <version > 1.1.1</version > </dependency > <dependency > <groupId > org.glassfish.jaxb</groupId > <artifactId > jaxb-runtime</artifactId > <version > 2.3.3</version > </dependency >
文件上传demo代码。
1 2 3 4 5 6 7 8 9 10 11 12 13 14 15 16 17 18 19 20 21 22 23 24 25 26 27 28 29 30 31 32 33 34 35 36 37 38 39 40 41 42 43 44 45 46 47 48 49 50 51 52 53 54 55 56 57 58 59 60 61 62 public class Demo public static void main (String[] args) throws Exception String endpoint = "https://oss-cn-beijing.aliyuncs.com" ; String accessKeyId = "" ; String accessKeySecret = "" ; String bucketName = "kongming234" ; String objectName = "001.jpg" ; String region = "cn-beijing" ; OSS ossClient = new OSSClient(endpoint, accessKeyId, accessKeySecret); try { String content = "Hello OSS,你好世界" ; PutObjectRequest putObjectRequest = new PutObjectRequest(bucketName, objectName, new FileInputStream("C:\\SunYuQi\\data\\研一\\工作\\files\\孔明.jpg" )); PutObjectResult result = ossClient.putObject(putObjectRequest); } catch (OSSException oe) { System.out.println("Caught an OSSException, which means your request made it to OSS, " + "but was rejected with an error response for some reason." ); System.out.println("Error Message:" + oe.getErrorMessage()); System.out.println("Error Code:" + oe.getErrorCode()); System.out.println("Request ID:" + oe.getRequestId()); System.out.println("Host ID:" + oe.getHostId()); } catch (ClientException ce) { System.out.println("Caught an ClientException, which means the client encountered " + "a serious internal problem while trying to communicate with OSS, " + "such as not being able to access the network." ); System.out.println("Error Message:" + ce.getMessage()); } finally { if (ossClient != null ) { ossClient.shutdown(); } } } }
36 实战篇-上传文件_阿里云OSS_程序集成 阿里云工具类开发,实际上就是对上面demo的修改。
1 2 3 4 5 6 7 8 9 10 11 12 13 14 15 16 17 18 19 20 21 22 23 24 25 26 27 28 29 30 31 32 33 34 35 36 37 38 39 40 41 42 43 44 45 46 47 48 49 50 51 52 53 54 55 56 57 58 59 60 public class AliOssUtil private static final String ENDPOINT = "https://oss-cn-beijing.aliyuncs.com" ; private static final String ACCESS_KEY_ID = "" ; private static final String ACCESS_KEY_SECRET = "" ; private static final String BUCKET_NAME = "kongming234" ; public static String uploadFile (String objectName, InputStream in) throws Exception OSS ossClient = new OSSClient(ENDPOINT, ACCESS_KEY_ID, ACCESS_KEY_SECRET); String url = "" ; try { String content = "Hello OSS,你好世界" ; PutObjectRequest putObjectRequest = new PutObjectRequest(BUCKET_NAME, objectName, in); PutObjectResult result = ossClient.putObject(putObjectRequest); url = "https://" +BUCKET_NAME+"." +ENDPOINT.substring(ENDPOINT.lastIndexOf("/" )+1 )+"/" +objectName; } catch (OSSException oe) { System.out.println("Caught an OSSException, which means your request made it to OSS, " + "but was rejected with an error response for some reason." ); System.out.println("Error Message:" + oe.getErrorMessage()); System.out.println("Error Code:" + oe.getErrorCode()); System.out.println("Request ID:" + oe.getRequestId()); System.out.println("Host ID:" + oe.getHostId()); } catch (ClientException ce) { System.out.println("Caught an ClientException, which means the client encountered " + "a serious internal problem while trying to communicate with OSS, " + "such as not being able to access the network." ); System.out.println("Error Message:" + ce.getMessage()); } finally { if (ossClient != null ) { ossClient.shutdown(); } } return url; } }
在controller中修改。
1 2 3 4 5 6 7 8 9 10 @PostMapping ("/upload" )public Result<String> upload (MultipartFile file) throws Exception String originalFilename = file.getOriginalFilename(); String filename = UUID.randomUUID().toString()+originalFilename.substring(originalFilename.lastIndexOf("." )); String url = AliOssUtil.uploadFile(filename,file.getInputStream()); return Result.success(url); }
37 实战篇-登录优化-redis_思路分析 登录:在用户修改了密码之后,服务器会下发新令牌,旧令牌应该作废。但之前的程序中并没有作废旧的令牌。
令牌主动失效机制:(虎符)
登录成功后,给浏览器响应令牌的同时,把该令牌存储到redis中。
LoginInterceptor拦截器中,需要验证浏览器携带的令牌,并同时需要获取到redis中存储的与之相同的令牌。
当用户修改密码成功后,删除redis中存储的旧令牌。
38 实战篇-登录优化_redis_SpringBoot集成redis SpringBoot集成redis
导入spring-boot-starter-data-redis起步依赖
在redis起步依赖中,会自动往ROC容器中注入StringRedisTemplate对象。
1 2 3 4 5 <dependency > <groupId > org.springframework.boot</groupId > <artifactId > spring-boot-starter-data-redis</artifactId > </dependency >
1 2 3 4 5 6 7 8 9 10 spring: datasource: driver-class-name: com.mysql.cj.jdbc.Driver url: jdbc:mysql://localhost:3306/kongming username: root password: 181234 data: redis: host: localhost port: 6379
调用API(StringRedisTemplate)完成字符串的存取操作
1 2 3 4 5 6 7 8 9 10 11 12 13 14 15 16 17 18 19 @SpringBootTest public class RedisTest @Autowired private StringRedisTemplate stringRedisTemplate; @Test public void testSet () ValueOperations<String, String> operations = stringRedisTemplate.opsForValue(); operations.set("username" ,"kongming" ); operations.set("id" ,"1" ,15 , TimeUnit.SECONDS); } @Test public void testGet () ValueOperations<String, String> operations = stringRedisTemplate.opsForValue(); System.out.println(operations.get("username" )); } }
39实战篇-登录优化_redis_主动失效机制实现 令牌主动失效机制:(虎符)
登录成功后,给浏览器响应令牌的同时,把该令牌存储到redis中。
1 2 3 4 5 6 7 8 9 10 11 12 13 14 15 16 17 18 19 20 21 22 @PostMapping ("/login" )public Result<String> login (@Pattern(regexp = "^\\S{5,16}$" ) String username, @Pattern (regexp = "^\\S{5,16}$" ) String password) User loginUser = userService.findByUserName(username); if (loginUser == null ){ return Result.error("用户名错误" ); } if (Md5Util.getMD5String(password).equals(loginUser.getPassword())){ Map<String, Object> claims = new HashMap<>(); claims.put("id" ,loginUser.getId()); claims.put("username" ,loginUser.getUsername()); String token = JwtUtil.genToken(claims); ValueOperations<String, String> operations = stringRedisTemplate.opsForValue(); operations.set(token,token,1 , TimeUnit.HOURS); return Result.success(token); } return Result.error("密码错误" ); }
LoginInterceptor拦截器中,需要验证浏览器携带的令牌,并同时需要获取到redis中存储的与之相同的令牌。
1 2 3 4 5 6 7 8 9 10 11 12 13 14 15 16 17 18 19 20 21 22 23 24 25 26 @Override public boolean preHandle (HttpServletRequest request, HttpServletResponse response, Object handler) throws Exception String token = request.getHeader("Authorization" ); try { ValueOperations<String, String> operations = stringRedisTemplate.opsForValue(); String redisToken = operations.get(token); if (redisToken == null ) { throw new RuntimeException(); } Map<String, Object> claims = JwtUtil.parseToken(token); ThreadLocalUtil.set(claims); return true ; } catch (Exception e) { response.setStatus(401 ); return false ; } }
当用户修改密码成功后,删除redis中存储的旧令牌。
1 2 3 4 5 6 7 8 9 10 11 12 13 14 15 16 17 18 19 20 21 22 23 24 25 26 27 28 29 30 31 32 33 34 @PatchMapping ("/updatePwd" )public Result updatePwd (@RequestBody Map<String,String> params,@RequestHeader("Authorization" ) String token) String oldPwd = params.get("old_pwd" ); String newPwd = params.get("new_pwd" ); String rePwd = params.get("re_pwd" ); if (!StringUtils.hasLength(oldPwd)||!StringUtils.hasLength(newPwd)||!StringUtils.hasLength(rePwd)){ return Result.error("缺少必要的参数" ); } Map<String,Object> map = ThreadLocalUtil.get(); String username = map.get("username" ).toString(); User loginUser = userService.findByUserName(username); if (!loginUser.getPassword().equals(Md5Util.getMD5String(oldPwd))){ return Result.error("原密码填写不正确" ); } if (!rePwd.equals(newPwd)){ return Result.error("两次填写的新密码不一样" ); } userService.updatePwd(newPwd); ValueOperations<String, String> operations = stringRedisTemplate.opsForValue(); operations.getOperations().delete(token); return Result.success(); }
40实战篇-SpringBoot项目部署 SpringBoot项目部署时,SpringBoot需要一个打包插件spring-boot-maven-plugin。
1 2 3 4 5 6 7 8 9 10 <build > <plugins > <plugin > <groupId > org.springframework.boot</groupId > <artifactId > spring-boot-maven-plugin</artifactId > <version > 3.3.1</version > </plugin > </plugins > </build >
1 找到IDEA右侧的maven菜单,big-event->Lifecycle->package(双击开始打包)。
2 运行jar包。
1 java -jar big-event-1.0-SNAPSHOT.jar
3 注意:jar包部署,要求服务器必须有jre环境。
41实战篇-SpringBoot属性配置方式 希望部署好的端口是9090不是8080。
application.properties配置文件
application.yml配置文件(常用,键值对)
命令行参数方式:
1 2 java -jar big-event-1.0-SNAPSHOT.jar --键=值 java -jar big-event-1.0-SNAPSHOT.jar --server.port=10010
该参数会传递给启动类的main方法,用一个args数组来接收。
环境变量方式:
外部配置文件方式:
注意port:后面有一个空格。
配置优先级:
项目中resources目录下的application.yml.
jar包所在目录下的application.yml
操作系统环境变量
命令行参数
他们的优先级依次升高。
42实战篇-SpringBoot多环境开发-基本使用 开发环境,测试环境,生产环境
多环境开发的单文件使用 Pofiles:SpringBoot提供的Profiles可以用来隔离应用程序配置的各个部分,并在特定环境下指定部分配置生效。
如何指定哪些配置属于哪个环境?
1 2 3 4 spring: config: activate: on-profile:环境名称
如何指定哪个环境的配置生效?
1 2 3 spring: profiles: activate: 环境名称
1 2 3 4 5 6 7 8 9 10 11 12 13 14 15 16 17 18 19 20 21 22 23 24 25 26 27 28 29 30 31 32 33 34 35 36 37 38 39 40 41 42 43 44 45 46 47 spring: datasource: driver-class-name: com.mysql.cj.jdbc.Driver url: jdbc:mysql://localhost:3306/kongming username: root password: 181234 data: redis: host: localhost port: 6379 profiles: active: test mybatis: configuration: map-underscore-to-camel-case: true --- spring: config: activate: on-profile: dev server: port: 8081 --- spring: config: activate: on-profile: test server: port: 8082 --- spring: config: activate: on-profile: pro server: port: 8083
多环境开发的多文件使用 SpringBoot提供的Profiles可以用来隔离应用程序配置的各个部分,并在特定环境下指定某些部分的配置生效。
43实战篇-SpringBoot多环境开发-分组 多环境开发Profiles分组功能:
服务器相关配置 application-devServer.yml
数据源相关配置 application-devDB.yml
自定义配置 application-devSelf.yml
1 2 3 4 5 6 spring: profiles: active: dev group: "dev": devServer,devDB,devSelf "test": testServier,testDB,testSelf
44实战篇-大事件前端项目开发_前置知识_js导入导出 前置知识 HTML,CSS,JS
JavaScript导入导出-按需导入 JS提供的导入导出机制,可以实现按需导入。
1 2 3 4 5 6 7 8 9 export function simpleMessage (msg ) console .log(msg) } export function complexMessage (msg ) console .log(new Data()+": " +msg) }
1 2 3 4 5 6 7 <script src ="showMessage.js" > </script > <script type ="module" > import {complexMessage} from './showMessage.js' <\script >
JavaScript导入导出-批量导出 js还可以实现批量导出。
1 2 3 4 5 6 7 8 9 function simpleMessage (msg ) console .log(msg) } function complexMessage (msg ) console .log(new Data()+": " +msg) } export {simpleMessage,complexMessage}
JavaScript导入导出-重命名 为js中函数实现重命名。
1 2 3 4 5 6 7 8 9 10 11 12 <body > <div id ="app" > <button id ="btn" > 点我展示信息</button > </div > <script type ="module" > import {complexMessage as cm} from './showMessage.js' ; document .getElementById("btn" ).onclick=function ( cm('我被点击了...' ) } </script > </body >
还可以在批量导出时定义别名。
1 2 export {complexMessage as cm,simpleMessage as sm}
在html导入时要相应的修改名字。不可以使用原来的名字。
1 2 3 4 5 6 7 8 9 10 11 12 13 14 <body > <div id ="app" > <button id ="btn" > 点我展示信息</button > </div > <script type ="module" > import {cm} from './showMessage.js' ; document .getElementById("btn" ).onclick=function ( cm('我被点击了...' ) } </script > </body > </html >
JavaScript默认导出 1 2 3 4 5 6 7 8 9 function simpleMessage (msg ) console .log(msg) } function complexMessage (msg ) console .log(new Data()+": " +msg) } export default {simpleMessage,complexMessage}
相应的导入代码为
1 2 3 4 5 6 7 8 9 10 11 12 13 <body > <div id ="app" > <button id ="btn" > 点我展示信息</button > </div > <script type ="module" > import messageMethods+ from './showMessage.js' ; messageMethods.simpleMessage('aaa' ); </script > </body > </html >
45实战篇-vue概述 Vue是一款用于构建用户界面的渐进式的JavaScript框架。(官方 )
学习路径:
整站使用vue:
Vue项目构建工具
Vue项目目录结构
Vue项目开发流程
Element-Plus
大事件前端:
46实战篇-vue快速入门 准备
准备html页面,并引入Vue模块(官方提供)。
创建Vue程序的应用实例。
准备元素(div),被Vue控制。
构建用户界面
1 2 3 4 5 6 7 8 9 10 11 12 13 14 15 16 17 18 19 20 21 22 23 24 25 26 27 <!DOCTYPE html > <html lang ="en" > <head > <meta charset ="UTF-8" > <meta name ="viewport" content ="width=device-width, initial-scale=1.0" > <title > Document</title > </head > <body > <div id ="app" > <h1 > {{msg}}</h1 > </div > <script type ="module" > import {createApp} from 'https://unpkg.com/vue@3/dist/vue.esm-browser.js' createApp({ data(){ return { msg:'hello vue3' } } }).mount("#app" ) </script > </body > </html >
47实战篇-vue指令_v-for 常用指令 指令: HTML标签上带有v-前缀的特殊属性,不同指令具有不同的含义,可以实现不同的功能。
v-for:列表渲染,遍历容器的元素或者对象的属性。
v-bind:为HTML标签绑定属性值,如设置href,css样式等。
v-if/v-else-if/v-else:条件性的渲染某元素,判定为true时渲染,否则不渲染。
v-show:根据条件展示某元素,区别在于切换的是display属性的值。
v-model:在表单元素上创建双向数据绑定。
v-on:为html标签绑定事件。
v-for 作用:列表渲染,遍历容器的元素或者对象的属性。
语法:v-for = “(item,index) in items”
参数说明:
- items:遍历的数组
- item:遍历出来的元素
- index:为索引/下标,从0开始;可以省略,省略index语法:v-for = "item in items"
1 2 3 4 5 6 7 8 9 10 11 12 13 14 15 16 17 18 19 20 21 22 23 24 25 26 27 28 29 30 31 32 33 34 35 36 37 38 39 40 41 42 43 44 45 46 47 48 49 50 51 52 53 54 55 56 57 58 59 60 61 62 63 64 65 66 67 68 69 70 71 72 73 74 75 76 77 78 79 80 81 82 83 84 85 <!DOCTYPE html > <html lang ="en" > <head > <meta charset ="UTF-8" > <meta name ="viewport" content ="width=device-width, initial-scale=1.0" > <title > Document</title > </head > <body > <div id ="app" > <table border ="1 solid" colspa ="0" cellspacing ="0" > <tr > <th > 文章标题</th > <th > 分类</th > <th > 发表时间</th > <th > 状态</th > <th > 操作</th > </tr > <tr v-for ="(article,index) in articleList" > <td > {{article.title}}</td > <td > {{article.category}}</td > <td > {{article.time}}</td > <td > {{article.state}}</td > <td > <button > 编辑</button > <button > 删除</button > </td > </tr > </table > </div > <script type ="module" > import { createApp} from 'https://unpkg.com/vue@3/dist/vue.esm-browser.js' createApp({ data() { return { articleList:[{ title:"医疗反腐绝非砍医护收入" , category:"时事" , time:"2023-09-5" , state:"已发布" }, { title:"中国男篮缘何一败涂地?" , category:"篮球" , time:"2023-09-5" , state:"草稿" }, { title:"华山景区已受大风影响阵风达7-8级,未来24小时将持续" , category:"旅游" , time:"2023-09-5" , state:"已发布" }] } } }).mount("#app" ) </script > </body > </html >
48实战篇-vue指令_v-bind 作用:为HTML标签绑定属性值,如设置href,src, style样式等。
1 2 3 4 5 6 7 8 9 10 11 12 13 14 15 16 17 18 19 20 21 22 23 24 25 26 27 28 29 <!DOCTYPE html > <html lang ="en" > <head > <meta charset ="UTF-8" > <meta name ="viewport" content ="width=device-width, initial-scale=1.0" > <title > Document</title > </head > <body > <div id ="app" > <a :href ="url" > blog</a > </div > <script type ="module" > import { createApp} from 'https://unpkg.com/vue@3/dist/vue.esm-browser.js' createApp({ data() { return { url: 'https://monica-y.github.io/' } } }).mount("#app" ) </script > </body > </html >
49实战篇-vue指令_v-if和v-show 作用: 这两类指令,都是用来控制元素的显示与隐藏的。